Thursday, October 31, 2013

John Seaman Reviews Tamiya's New M561 Gama Goat.

Photo courtesy Tamiya
Tamiya’s 1/35 scale M561 Gama Goat came as a surprise to most modelers. It certainly was not what I expected next from Mr. Tamiya.  But it does fill a gap in modern armor modeling and, I think, will be well received.  King’s was kind enough to offer me a test shot of the new kit a few weeks back. The production kit has just been released as I write this.

Designed by Roger Gamaunt, the Goat’s development history stretches back to the late 1950’s, with conceptual drawings going back as far as 1947.  The Advanced Research Projects Agency (ARPA), forerunner of the Defence Advanced Resarch Projects Agency (DARPA), funded project “Agile” in 1959 to develop a new tactical vehicle with superior off-road agility.  Chance Vought contracted with Gamaunt in 1959 to begin work on the project, a new venture for the venerable aerospace company. Ultimately, Chance Vought’s investment in Gamaunt’s design paid off, as Ling-Temco-Vought (LTV) won the design competition that grew from project Agile.  In 1968, Consolidated Diesel Electric was awarded the contract to actually produce the Goat.  The vehicle was expensive ($55K each in 2010 dollars) and complicated. It had six-wheel drive, an articulated frame, and simultaneous front and rear steering. It was also amphibious—though purportedly barely so.  Over 15,000 Goats were eventually built, with deliveries ending in 1973.  They served with the U.S. Army and Marines from 1969 into the 1980’s.  As far as I can tell, they were largely withdrawn from service by the late 1980’s.  Several variants were fielded in addition to the standard cargo version, including a mortar carrier, a counter-mortar radar system, an ambulance, and a communications vehicle.

It is not hard to find reference photos of Gama Goats online.  One set of useful walk around shots can be found on the Prime Portal site:

http://data3.primeportal.net/trucks/hans-hermann_buhling/m561_gamma_goat/

Squadron Signal has just released a new “Detail and Action”  on the Goat, by David Doyle.  There is a nice developmental history on the Vought Heritage Website:

http://www.vought.org/special/html/sgamaa.html

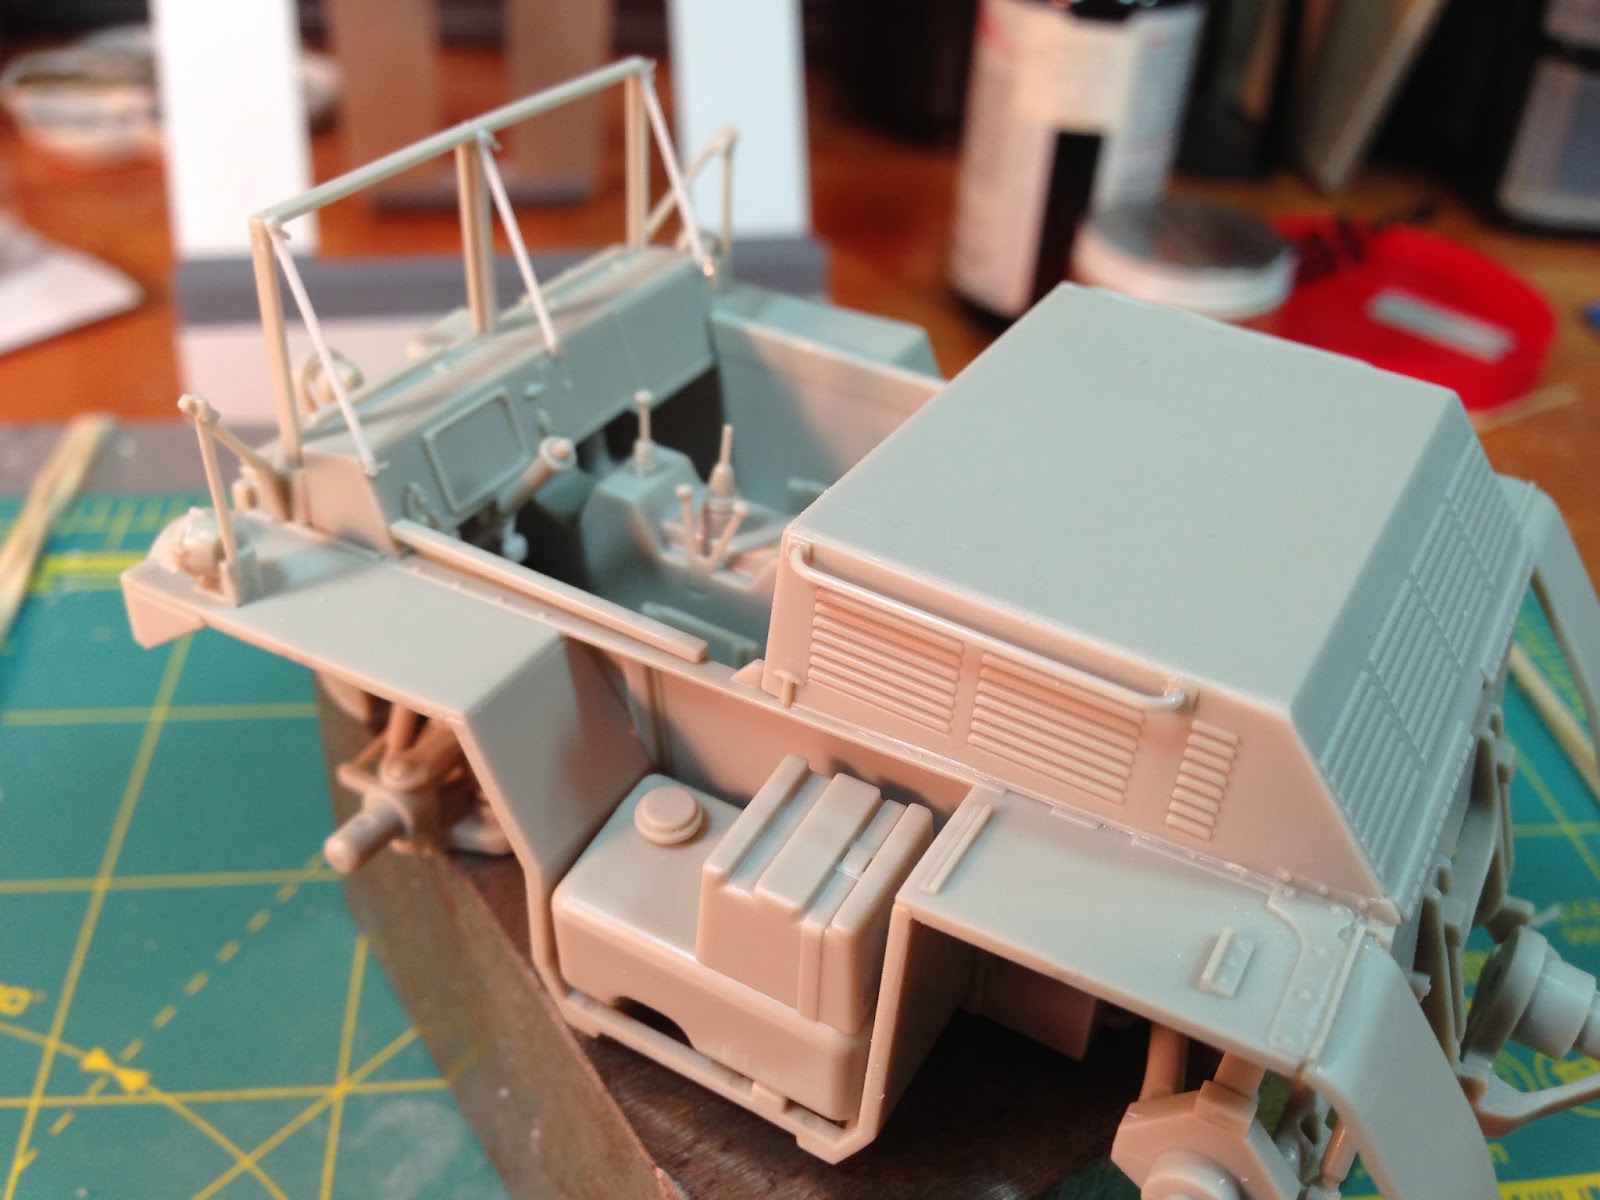
The Tamiya kit comprises three major parts sprues, a clear sprue, a decal sheet and polycaps.  It does not include covers for the tractor cab or carrier bed.  The production kit is in Tamiya’s familiar dark green plastic.  My test shot used the gray styrene seen in the photos below.

Step 1
Assembly begins with the forward
chassis, adding fender wells and
suspension springs.  As expected,
there are some mold seams to be
cleaned up on the springs, and the
locator tabs for the fenders need to
be filled.  I plan to have a bit of
accumulated dirt and grime, so I
merely scraped the latter smooth.


 Step 2
The front and rear suspension
assemblies are the focus of Step 2.
Minimal clean-up here—just the odd
mold seam to scrape.  Everything
“clicks” together very precisely, as
expected from a Tamiya kit.


Step 3
The front and rear suspension are
attached to the tractor chassis in this
step.


 Step 4
The tractor rear panel, along with its
complex articulation frame and universal
joint are up next.  Although the instructions show the universal joint (part B37—circled on the instruction sheet) it was not to be found on any sprue in my test shot.  I’ve since seen it on photos of the production sprues.  It will be difficult to see on the finished vehicle, so I did not bother to fabricate a substitute.

Step 5
The rear panel is attached to the forward chassis in this step.  The instructions call for
the exhaust pipe to be added, but I’ll wait to do that so as to make weathering it easier.


Step 6
The crew cab receives our attention next.  There are a few ejection pin marks to be filled on the floorboard.  I did so with my punch and die set. Curiously, Tamiya chose not to include clutch, brake, or accelerator pedals.  These are not hard to add but, for an open-cab vehicle, they are quite visible and should have been included with the kit.


A decal is provided for the instrument panel, but there are no raised bezels or other details within the rectangular frame housing the instrument faces.  More on this later.  Another omission is a prominent heating duct that is visible on the
passenger-side floorboard.  I added this by heating a piece of plastic rod, bending it to shape, then wrapping it with stretched sprue to achieve an “accordion” effect.  The passenger seat will cover the butt-end.  I postponed adding the various gear shift levers and knobs.


Step 6, continued...
Very nice decals are provided for data placards.  Their position is indicated in this step, but I will add them after painting.  Two options are given for the windshield, attached or removed. I chose the former as I think it makes for a more interesting vehicle. However, the three support struts, shown clearly in the box art, are not included in the kit.  They will not be hard to add with plastic rod.


Steps 7 and 8
We construct the two side-mounted fuel tanks in Step 7, and attach the steering wheel column. The front of the crew cab, the dashboard, fuel tanks, and a few small details are added in Step 8.

At this point I decided to add the missing support struts. I’ve seen them attached with
bolts in photos, but decided to use wing nuts for a little more interesting visual effect. I
installed the gears and leavers called for earlier in the instructions as well.

Step 9
Here you can add the driver and the steering wheel. The former is not well detailed, so I omitted him. The latter I will save for later.

Step 10
Wheels and the front bumper
are added in this step. Tamiya
provides the wheels in plastic,
to be attached using polycaps.
The wheels are two-part affairs
requiring a little cleanup. I’m
sure someone will offer resin
replacements, but the kit
wheels are really just fine. The
bumper has three ejector pin
marks but they are easily
removed. I attached it later.


Step 11
The engine cover
comes next.  It
consists of three
pieces: two sides and
a one-piece top, front,
and back.  Delicate
handholds are added.
Fit is excellent.  It’s beginning
to look like a Goat!


Steps 12 and 13
One option calls for a
front-mounted winch,
to be constructed in
Step 12, along with
rear-view mirror and
headlight details.
These are attached in
Step 13. I decided to
attach the vulnerable
mirrors later. I also
left the lenses off until
after painting.


Step 14
We next turn to the carrier unit. The tie-rods and other suspension elements molded into the lower part of the carrier tub are quite delicate. Although well protected on the sprue, you will need to be careful removing them and in subsequent handling. By the way, those are not ejector pin marks—I have seen those circular depressions in photos of the real vehicle.  Rear suspension elements are added in this step.


Step 15
The carrier’s rear panel and tailgate are constructed in this step. The tailgate has some
easily-removed ejector pin marks on its inside face. The pioneer tools are reasonably
well detailed and attach to the tailgate.


Step 16
The carrier’s lower pan and upper tub are
mated in this step, along with the rear panel.
The instructions call for attaching the tailgate
at this point, but I left it for latter to facilitate
painting.


Step 17
The carrier’s side and front panels are added next. Fit is reasonable, with but a few slight gaps to fill underneath. The railings on the front panel are very delicate and will require careful handling. Some builders may want to refine the fender well detail, adding wiring and eliminating the odd ejector pin mark. The large wheels and tires will hide most of this so I opted for the stock results.
Step 18
This last step brings everything together. The carrier attaches to the tractor using
a polycap and the joint is flexible, so diorama builders should be able to articulate
the vehicle as desired.


 Painting and Weathering


There are three painting and marking options
available with the kit. Option A, shown on the box-art, is a Goat in the 82nd Airborne, Grenada, 1983. It is in the four-color camouflage scheme from that era. This requires color mixing if you are using Tamiya acrylics, and the instructions provide mixing ratios. Option B is a 3rd Marine Division Goat, stationed at Camp Fuji (no date given). It is in overall olive drab and the instructions suggest using Tamiya’s TS-28, “olive drab II”. Option C is for a U.S. Army Goat from an unknown unit, circa 1978. It too is in overall olive drab. I chose Option B.


 I began with an overall primer coat using
Tamiya fine gray primer. Next came several
misted applications of TS-28. This served as
a foundation for my final olive drab coat using
the slightly lighter Gunze Aqueous Color H 78. This yields a nice, semi-gloss finish, over which the decals were applied without problems. By the way, use warm water to soak the decals, per Tamiya’s
instructions. It will make a difference!  Next came the placards mentioned earlier, along with the instrument panel. As previously noted, Tamiya provides the instrument decal only, with no molded
bezels are other detail. I used thin plastic card and my punch-and-die set to make the basic panel, then wrapped thin wire around one of the punches to form bezels.


Weathering came next. I literally chipped the paint in some places, using a
toothpick. This is the advantage of Gunze acrylic over TS-28—the undercoat is
tough and the overcoat is not! The chipped places reveal the slightly darker
undercoat. I added a thin black wash in some areas, along with some fuel stains
on the tanks. After airbrushing an acrylic flat coat, I panel-faded with Mig
pigments, lightly sealing with more flat as I progressed.  The underside received clumps
of pigment using Mig’s Fixer, resulting in fairly durable “dirt” buildup. I blended the underside weathering with an extremely thin airbrushed coat of Tamiya buff (XF-57). I continued this light dusting up onto the lower sides of the vehicle. With my fingers, I rubbed graphite onto various edges
of the vehicle to simulate worn areas. This darkens the olive drab and gives it a slight sheen.

The tires, which had been painted Tamiya rubber black (TS-82), received the
Tamiya buff treatment as well. I followed this by a rub-down (with my fingers!)
using Mig’s black soot pigment, leaving the buff color in the tires’ recesses.
After adding the clear parts and a few other odd details, I had my Goat!


Friday, October 11, 2013

King's Has Barracuda Studios 1/32 F4U Update Parts

King's has recently received the new Barracuda Studios resin update parts and decals for the incredible Tamiya 1/32 F4U-1 Corsair.  The Tamiya kit does nor need much help but there are a couple of areas that left to door cracked for updates.  The first issue is the rubber main wheel tires.  I am not a fan of rubber tires in aircraft model kits.  It is difficult to remove the inevitable central mold flash line on rubber tires without damaging them. They also look too glossy, and are hard to age where I can count on them retaining paint or pigment over time.  Additionally, modelers are limited to the diamond tread pattern on the kit tires.  Examination of photos reveals that there are several different tread patterns on Corsair tires.   Another issue is that Tamiya provides later style distributor housings for the top of the engine which are not typical for early wartime  Corsairs.  Barracuda Studios has addressed these issues, plus they have issued a set of water slide decal cockpit placards to enhance the level of detail in the wonderful kit unit.

Listed below are the new updates for the 1/32 Corsair from Barracuda Studios:

3104-32118 Corsair / Hellcat Wheels Plain Tread - $11.95
   3104-32119 Corsair / Hellcat Wheels Diamond Tread - $11.95
3104-32126 Corsair Early Engine Upgrade Set - $8.95
3104-32129 F4U-1 Corsair Cockpit Stencils and Placards - $9.95
These products are all great quality for a great price.  They address minor issues with the best ever Corsair kit and they won't blow your budget.  My hat is off to Roy Sutherland at Barracuda Studios for getting it right again and again.

Brad Perry


Wednesday, September 25, 2013

Hasegawa Releases All New 1/72 MV-22B Osprey

Now Available At King's Hobby Shop!
Hasegawa 1/72 MV-22B Osprey USMC
Stock Number:  3260-01571
Price:  $64.95

Fans of the tilt-rotor Boeing / Bell Textron Osprey will be delighted with this all new tooling 1/72 MV-22B from Hasegawa.  Kits of Ospreys are few and far between and with this new release, Hasegawa has set a high mark for a model in any scale of this unique aircraft.

The kit is comprised of 158 parts which are molded in Hasegawa standard light gray plastic.  A typical but extensive Hasegawa water slide decal sheet is provided with markings for two different aircraft and complete technical stenciling.  Subject aircraft are from VMM-165 and VMM-265.  Both birds appear to be in standard low visibility MV-22B Camouflage except for the tails which feature colorful high visibility markings.  The VMM-165 tail is black with yellow trim and features the squadron's unit patch.  The VMM-265 is red with black codes and squadron patch.  Instruction sheet is standard Hasegawa bi-lingual format with Japanese and English.  Illustrated diagrams guide the modeler thru the building sequence with part numbers, painting color call outs, and decal placement.

Exterior details for the model are good and feature engraved panel lines.  I don't have scale drawings for this aircraft so I can't say positively that the kit dimensions are 100% correct, although they appear to be from published dimensions.  Close examination of photos seems to indicate that most external features are present and correct.  Features include FLIR pod, retracted refueling probe,  missile launch detection units at four points for 360 degree coverage, various antennas, and bulged cuffs near the base of the prop-rotors.  The only interior detail in the kit is the cockpit and it is somewhat abbreviated.  Instrument panel, consoles, control sticks, and seats are provided.  Decals provide details for the otherwise flat instrument panel and consoles.  Hasegawa includes two crew figures to fill pilot and co-pilot seats.  The kit is completely devoid of interior detail aft of the cockpit.  No cargo bay detail is included so the rear cargo door can only be displayed up or closed.

Kit options include positionable engine pods, positionable landing flaps, and retracted or extended landing gear.  A flight display stand is included if the engines are displayed in horizontal configuration.  Modelers can easily modify the refueling probe to the extended position by adding appropriate diameter styrene plastic rod or tube.  The kit cannot be built out of the box with folded wings or prop-rotors as would be seen while stored aboard ship.  Modelers may wish to modify the kit to do this, but this would be challenging.

This is a very nice no frills model.  Fans of the MV-22B, or modelers looking for a change of pace will enjoy building and displaying this replica of the first operational tilt-rotor aircraft.  I recommend this kit as the best Osprey to date.

Brad Perry

http://www.bellhelicopter.textron.com/en_US/Military/Bell-BoeingV-22/1291148374339.html#/?tab=highlights-tab

http://en.wikipedia.org/wiki/V-22_Osprey


Friday, September 20, 2013

New Revell Germany 1/32 Bf 109G-6 Best In Scale.


Kit:  1/32 Scale Bf 109G-6 Early or Late Version
Manufacturer:  Revell Germany
Stock Number:  3471-4665
Price:  $29.99
Status:  Available at King's Hobby Shop Now!

Revell Germany now has the best 1/32 scale Bf 109G on the market.  Overall accuracy combined with its low price, makes this new Messerschmitt a particularly good value.  The kit includes 14 parts trees, one sheet of water slide decals, and instructions for building and painting.  Optional parts will allow the builder to complete one of almost any non DB 605AS engined Bf 109G-6 variant.

Kit cockpit interior detail is very good.  Purists will want to add sidewall wiring and control stick detail.  These tasks will be simple for any modeler with intermediate skills and good picture references.  Kit instrument panel has good detail and correctly represents the bi-level panel on the real aircraft.  Instrument bezels are sharply defined and instrument faces are provided on the decal sheet.  Seat-belts are molded on seat components, but have fairly good definition.  They should paint well if proper wash and dry brush techniques are used.  The prominent fuel line with fuel flow sight glass easily seen on the right cockpit sidewall is provided as a separate clear part.  When painted properly, it will correctly represent the fuel line with clear glass tube and hose clamps.  Also, early and late gun sight options are included.

Fuselage components have recessed  panel lines and access hatches.  Revell provided all access hatches for all sub-variants.  You'll want to pay attention to your references because some will need to be removed depending on the version you choose. I'd rather do this than try to scribe one which isn't there.  The kit provides parts for early angled rudder tail as well as late wood straight rudder tail.  Separate rudder (3 types) and elevator control  surfaces will allow the builder to show them deflected as desired.   Clear parts for early heavy frame and late "Erla" canopies are included along with rear armored glass piece.  Engine cowl parts are for original DB 605 engine variants and feature the prominent and separately molded bulges which covered the back end of the cowl mounted MG 131 machine guns.  The kit bulges appear to be somewhat shallow.  If this is the case, I'm sure there will be an aftermarket resin correction.  On the positive side,  the kit's propeller spinner appears to have the most correct shape in scale when compared to other kits and photos of the real one.

The kit's wings also have recessed panel detail as well as separate control surfaces.  Ailerons, flaps, and leading edge slats can be positioned as desired.  Landing gear and landing gear bays are the best to date for a "Gustav".  Main gear bays assemble with multiple parts and include structural detail as well as open lightening holes.  Wheel bay detail in other Bf 109 kits has been very abbreviated.  Main gear struts are also multi part and appear to have more detail than other kits including separate torque link forks and retraction actuator rods.  Kit tires are outstanding.  The instructions have you use the classic German cross tread tires, but an optional set of no tread tires are included.  The kit also includes optional styles of wheel covers.  Revell also provides separate center-line drop tank and drop tank rack.

Kit decals include markings for two aircraft.  The first was flown by Hauptmann Franz Dorr who was the Gruppenkommandeur of III JG.5.  The aircraft's werknummer was 411960.  The second aircraft, werknummer 160717, was flown by Hauptmann Karl Rammelt who was Kommandeur of II JG.51.  Technical stencils common to any Bf 109G are also included.  The decals are well researched by AirDOC and appear to be accurate and in register.

This is a very nice kit out of the box.  There are tons of aftermarket options made for other 109s in both photo etch and resin which can probably be used in this kit.  Wait a few weeks, and there will probably be numerous options specifically for this kit if you wish to increase the level of detail already present.

I like this kit.  Overall, it appears to be the most accurate in dimension and contour.  At $29.99,  it is less than half the price of prior top dog.  Current list price for the 2001 release Hasegawa Bf 109G-6 is $74.00.  While no kit is perfect including this one, it provides more options, it is overall more accurate than the still very nice Hasegawa offering, and it is considerably less expensive.  I think it would look great sitting next to your Tamiya P-51D of Spitfire Mk.IX!
 

Brad Perry 

Stop the press!  This just in!


We just received Brett Green's new book specifically about this great new kit from Revell.  Projects in the book from Brett Green, Chris Wauchop, Marcus Nicholls, and Roy Sutherland.  Excellent coverage of this jewel with insights into simple out of the box construction to advanced builds utilizing aftermarket details.  Book is beautifully laid out with loads of clear color photos.  Also includes great walk around photos of Bf 109G-6s in museum collections.  I highly recommend this book to fire you up prior to diving into one of these kits yourself. 

Title:  How To Build Revell's 1/32 Messerschmitt Bf 109G-6
Stock Number: 6292-ADH32
Price:  $29.95


Thursday, September 19, 2013

Interesting News From Kittyhawk And Great Wall Hobby!


Here are two new 1/48 kits coming soon from Great Wall Hobby and Kittyhawk.

Great Wall Hobby has announced a new 1/48 F-15C/D Eagle.  It is safe to assume it will be the first in a series of new Eagles for 1/48 modelers.  Release date is supposed to be November 2013, but the price is unknown at this time.  Also of interest is that the pre-release illustrations indicate that the kit will include U.S. as well as Israeli weapons.  It also looks like the kit will include complete Pratt and Whitney F100 engines.  This kit should prove to be the best pure fighter F-15 kit in scale.

Kittyhawk has announced a new 1/48 F2H-3/4 Banshee.  This aircraft has been very high on many modelers wish lists for a long time.  It's nice to see model companies respond to customer input.  Release date and price for this kit are unavailable at this time.

Check out these links for more information on these exciting new kits.


http://hyperscale.com/2013/reviews/kits/kittyhawkpreview_6.htm

http://hyperscale.com/2013/reviews/kits/gwhf15bdpreviewbg_1.htm 
 

Brad Perry


Wednesday, August 7, 2013

George Mann's Build Review of New 1/35 Scale Tamiya JGSDF Type 10 Tank.


Manufacturer & Stock Number:    Tamiya 35329  
Price:    $77.98 
   
Product Name:    JGSDF Type 10 Tank

Scale:    1/35      
Review Type:    Sample (Pre production) Kit.            
Parts Count:    205 PS parts, 24 PE caps, two vinyl tracks, one vinyl mesh sheet and one clear acetate sheet.

     
Pros:    Well engineered kit with excellent textures and painless assembly.

      
Cons:    Ejector pin marks on skirts, sight housing and suspension, no 50 cal ammo.

    
Type 10 History:

The Type 10 is the newest JGSDF MBT and is designed to complement and eventually replace the Type 90 MBTs in service.  Development began in the 1990s, the prototype was unveiled during 2008 and the first tanks entered service in January 2012.  The JGSDF plans to acquire 68 examples at a cost of between $6.5 and $11.3 million dollars as production ramps up.
The Type 10 has a crew of three:  Commander, Gunner and Driver in the standard layout with the Commander and Gunner in the turret and the Driver in the hull.  The tank is equipped with an autoloader for the main gun. The Commander has a panoramic sight and fully integrated c4I systems to allow integration with other tanks and the infantry they are supporting.
The Type 10 is armed with a locally developed 120mm/L44 smoothbore gun likely derived from the Rheinmetall L44 120mm.  The Type 10 also has similar options for longer 50 and 55 caliber length barrels.  The gun will fire newly developed AP ammunition as well as standard NATO ammunition.  Small arms firepower is provided by the M2 12.7mm HMG in the commander’s station and a 7.62mm GPMG coaxial with the main gun.
The Type 10 weighs about 44 tons which is six tons less than the older Type 90.  It is also physically smaller while being fitted with more advanced and capable nano-crystal steel and modular ceramic composite armor.  The 1200HP V8 diesel engine coupled with a continuously variable automatic transmission which allows a top speed of about 43MPH (70 KPH) in either forward or reverse and the tank is fitted with a hydropneumatic active suspension that allows the crew to adjust the suspension height as desired.

Kit Overview:

The Tamiya Type 10 is a very well designed kit with 205 light grey, green in the retail kit, PS parts, four large polyethylene caps, 20 small polyethylene caps, two vinyl tracks, one vinyl mesh sheet and one clear acetate sheet.  The instructions are clear and concise and the kit goes together without any major issues.  Further, it is very well detailed and has excellent surface textures.  The vision blocks have separate acetate pieces for use as the viewports and the turret hatches, panoramic viewer and gunner’s sight can be modeled in the open or closed positions with the provided doors.  There are several antiskid pads, hinges, light fixtures, exhausts, intakes and other fittings which are very well done.  The model sports detailed laser detectors, an extendable environment sensor and fine guard rails for the environment sensor on the back of the turret.  The horn is even molded as a separate piece and fits nicely in its recess in the front of the hull.  The vinyl tracks are excellent and are very detailed.  Further, they will assemble with the Tamiya cement which makes things much easier.
There are a few minor issues with the kit.  Keep in mind, however, that this is a preproduction sample and may not be entirely representative of the market kit.  First, there are several ejector pin marks on the rubber skirts which require cleanup.  The issue is that there seem to be far more of these, about 30 per side, than necessary.  Secondly, there are ejector pin marks on the outboard facing side of each suspension arm.  These probably could have been hidden on the inboard side.  There was one part, the HMG spent shell ejection port, that had a very visible heat sink on the underside.  I used Mr. Surfacer 500 on the above areas to cover the holes.  The underside of the sight housing had four ejector pin marks that needed sanding.  Again, it seems there are more than necessary.  The kit also does not have a belt of 50 cal ammunition and the ammunition box for the HMG is molded empty with no lid.

Kit Construction:

The kit offers no major problems during construction and goes together very easily.  The vinyl mesh for the turret basket and headlight guards must be cut into several pieces before being glued in place. The instructions are clear for these steps but the headlight guards require the headlights and surrounding area to be painted prior to completing the hull assembly.  Fortunately, the front glacis plate is molded in two parts that are separate from the rest of the hull which makes the task much easier.  The acetate sheet must also be cut into smaller pieces to fit the vision blocks but there is plenty of material here and it’s no issue if you cut a few improperly.  The tracks appear to be too long and one link may be removed to ensure a better fit.  This is not difficult since the tracks can be glued together with Tamiya cement.

Differences in the Model and Actual Vehicles:

There are some slight differences between the model and the prototype and production versions of the actual vehicle.  The first is that the tracks supplied appear to be from the prototype vehicle since the photos available online of the production models have rubber pads in the track links and the model does not.  Another is the small aperture just over the main gun which appears on the prototypes but not the production vehicles.  Further, the tow cable hooks to the rear of the vehicle near the tail lights at the bottom of the hull in the prototypes and at the top of the rear hull in the production vehicles. The smoke dischargers on the prototype are different from the production models in that the production setup has one large oval cutout for the dischargers and the prototype has one round hole per discharger.  The prototype’s radio antennae are nearly vertical where the production model’s angle to the rear and the yellow decal that appears similar to the letter “M” does not appear on production models.  Finally, the prototypes have round headlights and mesh covers arranged towards the center front of the hull and the production vehicles have these nearer the tracks and behind mesh covers angled the same as the hull.  However, some of these differences do not appear in the later prototype versions and the model most nearly reflects an early model production vehicle with prototype tracks.

Conclusion:

The Tamiya Type 10 is an excellent model kit and is extremely rewarding to build.  It is very well engineered and the parts count is kept to a very reasonable level which is quite welcome.  The mentioned issues are minor especially compared to the ease of assembly and the outstanding detailing of the vehicle.  I highly recommend this kit to anyone interested in modern armored vehicles.

Photographs:


Sunday, August 4, 2013

Diorama Night at King's Hobby Shop

King's Hobby has been asked by the Texas Military Forces Museum to participate in the renovation of their 19th Century Gallery.  Among the many new and exciting displays will be two new dioramas commemorating Civil War battles fought in Texas.  "The Battle of Sabine Pass" is complete (see photo essay below)..."The Battle of Galveston" is just getting started!

Tuesday nights at King's Hobby will become "Diorama Nights".  Any interested modeler, regardless of skill level, is welcomed.  If you want to come out to practice some skills, learn new techniques, or just hang-out with modelers; drop by King's on Tuesdays at 6:00.  All tools and supplies will be provided, but feel free to bring your favorite Xacto just in case.

Now presenting, "The Battle of Sabine Pass";

Here's a satellite image of the area;
We add contours and groundwork;


Then comes the water.  This was the largest pour any of us had ever attempted...and it took over a month to dry completely.

 Then we add the details...cannon, water effects, smoke, the lighthouse and other details;